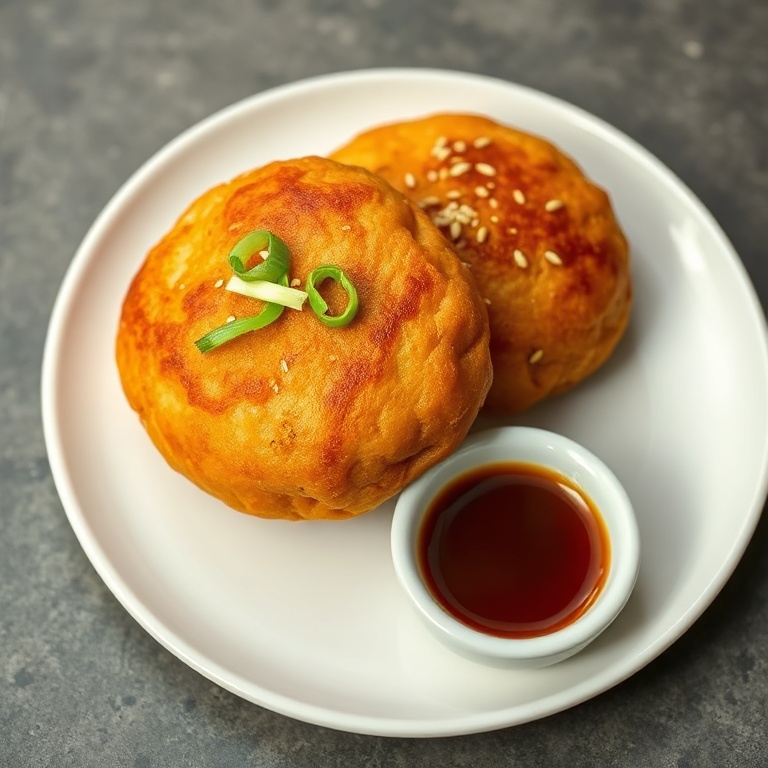
Easy Vegan Pan-Fried Buns Crispy Cabbage Filling
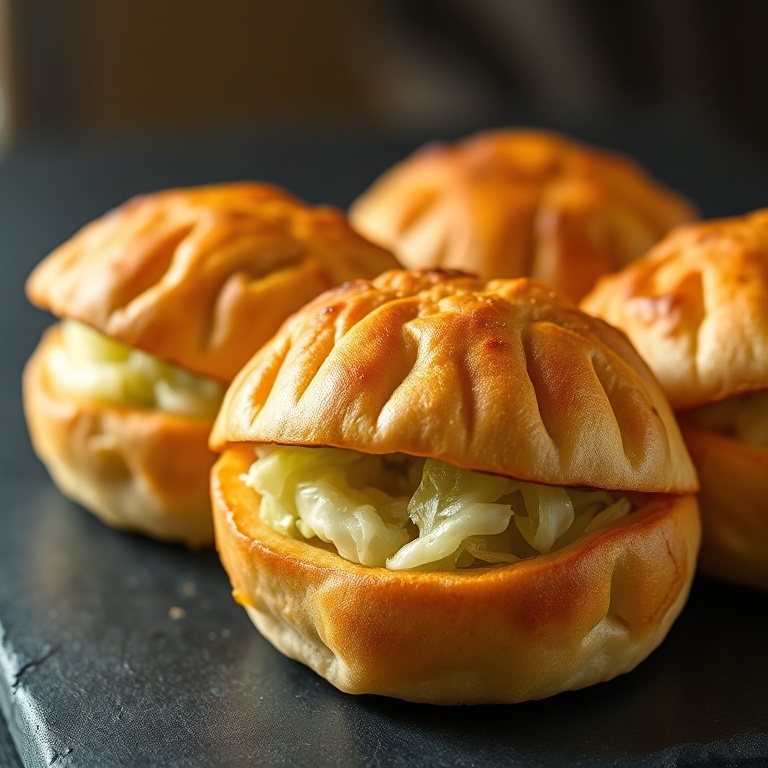
Easy vegan pan-fried buns deliver crisp bottoms and tender, juicy filling. Weeknight takeout cravings vanish when you’ve got just 30 minutes. After making this dozens of times, I know exactly when the oil is hot enough. Crispy golden edges give way to soft, savory cabbage inside. Try the Easy Cheesy Garlic Ritz Bits Snack Recipe for another crowd-pleasing bite. Jump to the recipe card or keep reading for my best tips. If you love recipes like this, you’ll also enjoy Easy Cheesy Garlic Ritz Bits Snack Recipe and Easy Crockpot French Dip Sandwiches Recipe.
Why This Easy Vegan Pan-Fried Buns Crispy Cabbage Filling Is Pure Comfort
- Crispy bottoms every time—no soggy surprises
- Cabbage stays tender, not watery or mushy
- No tofu crumbling—firm texture locks in filling
- Makes 12 buns, so perfect for sharing or freezing
What You'll Need for Easy Vegan Pan-Fried Buns Crispy Cabbage Filling
Choosing the right ingredients makes a big difference, but this recipe is forgiving enough to work with what you have.
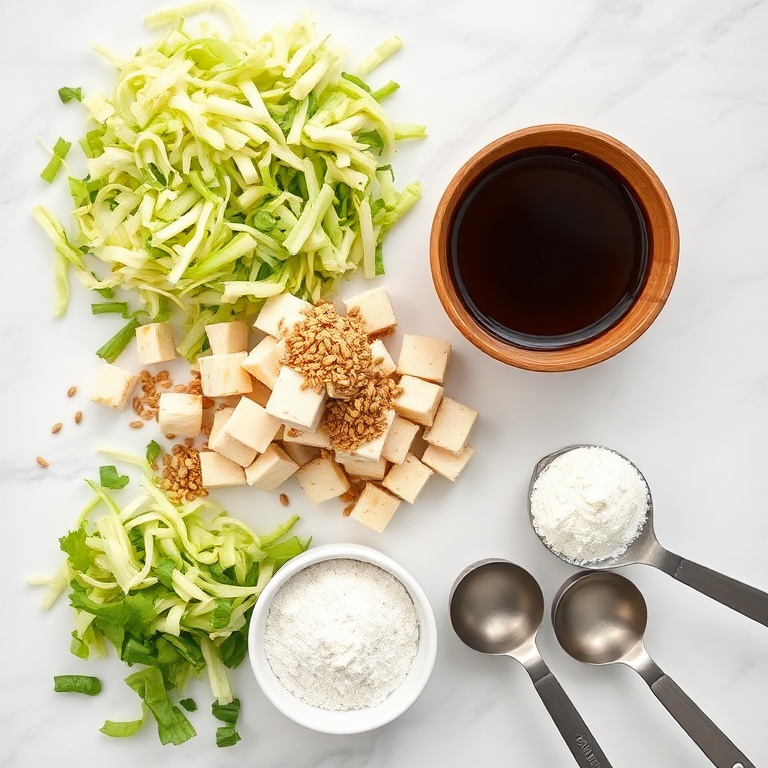
- 12 round 6-inch vegan dumpling wrappers (wonton size)
- 4 cups finely shredded green cabbage (about 1/2 medium head)
- 1/2 cup firm tofu, pressed and crumbled fine
- 2 tbsp rice vinegar
- 1 tbsp soy sauce (or tamari)
- 1 tbsp toasted sesame oil
- 1 tsp fresh ginger, minced fine
- 2 green onions, thinly sliced
- 1/2 tsp white pepper
- 1/4 tsp garlic powder
- 1/4 tsp onion powder
- 1/2 tsp sugar
- 1/4 tsp toasted sesame seeds (for filling)
- Optional: Soy-ginger dipping sauce
- Optional: Scallion ribbons
- Optional: Extra toasted sesame seeds
- Optional: Chili oil drizzle
📝 Ingredient Notes
- Vegan dumpling wrappers: Look for 'wonton wrappers' labeled vegan—no egg or lard. Refrigerated section works best for pliability.
- Green cabbage: Shred finely and toss with 1/2 tsp salt, then squeeze hard in a clean towel. This removes excess water and prevents soggy buns.
- Tofu: Press for 15 minutes—wrap in paper towels, place a heavy can on top. Crumble with fingers, not a fork, to keep texture intact.
🛒 Tools & Equipment I Recommend
- Nordic Ware Nonstick Skillet — Prevents sticking and delivers ultra-crispy bottoms without oil overload → See on Amazon
- OXO Good Grips Salad Spinner — Removes water from shredded cabbage fast—critical step for crisp buns → See on Amazon
How to Make Easy Vegan Pan-Fried Buns Crispy Cabbage Filling
- Prep cabbage: Shred cabbage finely. Toss with 1/2 tsp salt. Squeeze hard in a clean towel until no more water comes out—about 1 minute. Set aside.
- Make filling: In a bowl, combine pressed tofu, cabbage, rice vinegar, soy sauce, sesame oil, ginger, green onions, white pepper, garlic powder, onion powder, sugar, and sesame seeds. Mix gently but thoroughly. Chill 10 minutes.
- Wrap buns: Place 1 heaping tbsp filling in center of wrapper. Fold edges up and pleat to seal tightly—no gaps. Press gently to flatten slightly.
- Pan-fry: Heat 2 tsp oil in nonstick skillet over medium heat. Place buns seam-side up. Cook 3 minutes until golden brown underneath.
- Steam-fry: Pour 1/4 cup water around buns—do not pour on top. Immediately cover and steam 6 minutes. Uncover and cook 2–3 more minutes until water evaporates and bottoms re-crisp.
Cook's Tips for Perfect Easy Vegan Pan-Fried Buns Crispy Cabbage Filling
- Timing: Don’t rush the cabbage squeeze—extra water = steam explosions and soggy bottoms.
- Common mistake and fix: If buns stick, oil wasn’t hot enough. Wait until a drop of water sizzles and dances before adding buns.
- Texture: Use medium heat—not high. High heat browns too fast and leaves uncooked filling inside.
- Sealing: Wipe wrapper edges with water before pleating. Dry edges crack and leak steam during cooking.
Storing & Reheating Easy Vegan Pan-Fried Buns Crispy Cabbage Filling
Short-Term Storage
Store in an airtight container in the fridge. Store cooked buns in airtight container up to 4 days. Make-ahead tip: Filling keeps 2 days refrigerated. Wrap buns up to 1 day ahead—store uncooked, covered, chilled.
Freezing Easy Vegan Pan-Fried Buns Crispy Cabbage Filling
Freeze uncooked buns on parchment-lined tray, then bag. Cook from frozen—add 1 minute steam time.
How to Reheat Without Drying It Out
Oven: Bake at 375°F on parchment for 8 minutes. Crisp returns. Microwave: Not recommended—makes bottoms rubbery. If needed, 30 seconds only.
Recipe Notes
- Chef tip: Let buns rest 2 minutes after cooking—this sets the crust and prevents breaking when lifted.
- Best substitution: Swap cabbage with napa cabbage or bok choy—they’re naturally less watery and sweeter.
- Make-ahead: Wrap uncooked buns and freeze. Cook directly from freezer—no thaw needed.
- Scaling: Double the batch? Use two skillets or cook in two batches—crowding drops temp and steams instead of crisps.
- Troubleshooting: If bottoms aren’t crispy, pan wasn’t hot enough or water wasn’t fully evaporated before removing lid.
Want to level up this recipe?
Instant-read thermometer — Tells you exactly when oil hits 350°F—no guesswork, no burnt bottoms, no soggy buns → Check price on Amazon
Easy Vegan Pan-Fried Buns Crispy Cabbage Filling
Ingredients
Main Ingredients
- 12 round 6-inch vegan dumpling wrappers (wonton size)
- 4 cups finely shredded green cabbage (about 1/2 medium head)
- 1/2 cup firm tofu, pressed and crumbled fine
- 2 tbsp rice vinegar
- 1 tbsp soy sauce (or tamari)
- 1 tbsp toasted sesame oil
- 1 tsp fresh ginger, minced fine
- 2 green onions, thinly sliced
Seasonings
- 1/2 tsp white pepper
- 1/4 tsp garlic powder
- 1/4 tsp onion powder
- 1/2 tsp sugar
- 1/4 tsp toasted sesame seeds (for filling)
Optional Toppings
- Soy-ginger dipping sauce
- Scallion ribbons
- Extra toasted sesame seeds
- Chili oil drizzle
Instructions
- Prep cabbage: Shred cabbage finely. Toss with 1/2 tsp salt. Squeeze hard in a clean towel until no more water comes out—about 1 minute. Set aside.
- Make filling: In a bowl, combine pressed tofu, cabbage, rice vinegar, soy sauce, sesame oil, ginger, green onions, white pepper, garlic powder, onion powder, sugar, and sesame seeds. Mix gently but thoroughly. Chill 10 minutes.
- Wrap buns: Place 1 heaping tbsp filling in center of wrapper. Fold edges up and pleat to seal tightly—no gaps. Press gently to flatten slightly.
- Pan-fry: Heat 2 tsp oil in nonstick skillet over medium heat. Place buns seam-side up. Cook 3 minutes until golden brown underneath.
- Steam-fry: Pour 1/4 cup water around buns—do not pour on top. Immediately cover and steam 6 minutes. Uncover and cook 2–3 more minutes until water evaporates and bottoms re-crisp.
Notes
- Chef tip: Let buns rest 2 minutes after cooking—this sets the crust and prevents breaking when lifted.
- Best substitution: Swap cabbage with napa cabbage or bok choy—they’re naturally less watery and sweeter.
- Make-ahead: Wrap uncooked buns and freeze. Cook directly from freezer—no thaw needed.
- Scaling: Double the batch? Use two skillets or cook in two batches—crowding drops temp and steams instead of crisps.
- Troubleshooting: If bottoms aren’t crispy, pan wasn’t hot enough or water wasn’t fully evaporated before removing lid.
Storage
- Fridge: Store cooked buns in airtight container up to 4 days.
- Freezer: Freeze uncooked buns on parchment-lined tray, then bag. Cook from frozen—add 1 minute steam time.
- Oven reheat: Bake at 375°F on parchment for 8 minutes. Crisp returns.
- Microwave reheat: Not recommended—makes bottoms rubbery. If needed, 30 seconds only.
- Make ahead: Filling keeps 2 days refrigerated. Wrap buns up to 1 day ahead—store uncooked, covered, chilled.
Nutrition Per Serving
- Calories: 185
- Protein: 5g
- Fat: 7g
- Carbs: 26g
- Fiber: 3g
- Sugar: 2g
- Sodium: 320mg
- Cholesterol: 0mg
- Sat. Fat: 1g
Nutritional values are estimates only. Actual values may vary by brand and portion size.
Easy Vegan Pan-Fried Buns Crispy Cabbage Filling FAQs
Yes. Shape and freeze uncooked buns on parchment, then transfer to a bag. Cook from frozen—add 1 minute to steam time. Filling stays fresh refrigerated 2 days.
Most likely cause: cabbage wasn’t squeezed enough. Even 1 tsp extra water creates steam that softens the bottom crust. Always salt and squeeze 1 minute—test by squeezing a handful tightly.
Yes—but they’ll be softer. Bake at 400°F on parchment-lined sheet for 18–20 minutes, flipping halfway. Crispness won’t match pan-frying, but it works for oil-free days.
Tempeh, finely crumbled and steamed 5 minutes first, holds shape better. Chickpea flour + water paste works but adds denser texture—use 1/4 cup chickpea flour + 2 tbsp water.
Absolutely. Their cozy, savory-sweet filling pairs perfectly with harvest flavors—serve alongside roasted root vegetables or warm spiced cider. They’re a crowd-pleasing appetizer for Thanksgiving weekend.
A Warm Final Note
I can’t wait for you to try Easy Vegan Pan-Fried Buns Crispy Cabbage Filling and see how effortlessly it comes together. When you make it, pop back here and leave a rating or share how it turned out — I love hearing from you!